Итак, задача. Есть сервер с Ubuntu 12.04. Он должен стать:
- PDC Windows-домена c Active-Directory.
- Сервером VPN (пусть, например, это будет PPTP, но с обязательной поддержкой MS-CHAP v2 и MPPE-128) с авторизацией на Radius –сервере (для определённости – freeradius).
- Соответственно – Freeradius-сервером.
- Терминальным сервером, на котором прозрачно авторизуются пользователи AD.
Ставим Samba4
Внимательно читаем Samba4/HOWTO. На момент начала установки была доступна следующая версия Samba4 -4.0.0rc2. Сейчас, насколько знаю – 4.0.0rc3. Я же работал с RC2 и описывать буду его.
Делаем все по инструкции HOWTO, но не забываем о нескольких нюансах:
- Мы ведь хотим, чтобы у нас происходила аутентификация наших пользователей AD на Linux-компьютере? Тогда не забываем установить в систему пакет libpam0g-dev (примерно так: sudo apt-get install libpam0g-dev). Без этих библиотек поддержка pam в samba4 не будет осуществлена (в построенном проекте будет отсутствовать каталог /usr/local/samba/lib/security/ с очень необходимой библиотекой pam_winbind.so).
- Я бы рекомендовал (настоятельно!) вместо ./configure использовать ./configure.developer.
Далее делаем, как описано в WiKi Samba4 HOWTO. Построенная samba4 будет размещена в директории /usr/local/samba/. Ещё раз обращу внимание, что все бинарные файлы samba4 располагаются в каталоге /usr/local/samba/bin/, службы – в каталоге /usr/local/samba/sbin/, поэтому обращаться к ним теперь нужно по абсолютным путям, либо же поправить переменную PATH, или же – как поступил я, ибо ставил samba4 на машину без samba3 – сделать символические ссылки всех файлов из каталога /usr/local/samba/bin/ в каталог /usr/bin/, а из каталога /usr/local/samba/sbin/ – в каталог /usr/sbin/.
Теперь делаем «заготовку» (provision) samba4, как описано в HOWTO. Помимо прочего, эта процедура создаст в каталоге /usr/local/samba/etc/ основной конфигурационный файл samba – smb.conf, который можно дополнить необходимыми опциями и «шарами» и… запускать самбу! Вот как выглядит мой /usr/local/samba/etc/smb.conf:
# Global parameters [global] dos charset = CP860 workgroup = <DOMAIN> # NetBIOS имя вашего домена realm = <domain.что-то> #ваш домен netbios name = <NetBIOS_Name> # NetBIOS имя вашего контроллера server role = active directory domain controller dns forwarder = 127.0.0.1 # этот же сервер является dns-сервером. template shell = /bin/bash # последние параметры в секции я поставил так, на всякий случай – хуже не будет… winbind use default domain = Yes winbind enum users = Yes winbind enum groups = Yes [netlogon] path = /usr/local/samba/var/locks/sysvol/uchteno.local/scripts read only = No [sysvol] path = /usr/local/samba/var/locks/sysvol read only = No #[profiles] # path = /var/lib/samba/profiles # read only = no # browseable = No # далее ваши «шары», описанные обычным способом. Для запуска samba4 в каталоге /etc/init/ создаем файл samba4.conf примерно такого содержания:
description "SMB/CIFS File and Active Directory Server" author "Jelmer Vernooij <jelmer@ubuntu.com>" start on (local-filesystems and net-device-up) stop on runlevel [!2345] expect fork normal exit 0 pre-start script [ -r /etc/default/samba4 ] && . /etc/default/samba4 install -o root -g root -m 755 -d /var/run/samba install -o root -g root -m 755 -d /var/log/samba end script exec /usr/local/samba/sbin/samba –D Запуск/остановка сервиса будет осуществляться так:
# service samba4 start # service samba4 stop # service samba4 restart Отдельной песни заслуживает настройка dns, т.к. на этом сервере уже крутился bind9 со своими зонами, а samba4, имея свой встроенный dns-сервер, не захотела «подружиться» с уже настроенным bind9, поэтому… давайте, пока ограничимся инструкциями HOWTO, а если будет интересно – потом я опишу связку samba4-bind9.
Всё остальное – строго по HOWTO, упомянутом выше, с несколькими замечаниями.
- Установленный на Windows 7 пакет Windows Remote Administration Tools имеет две неприятные особенности (пока заметил две):
— во-первых, в оснастке ADUC для свойств пользователя напрочь отсутствует вкладка «Dial-in» (или как она по-русски?), и, значит, настройку возможности удалённого доступа для пользователей придётся делать другими способами;
— во-вторых, управление групповыми политиками возможно только под учёткой Administrator, несмотря на то, что специально созданный пользователь был включён во все возможные группы… - Честно скажу, пока не разбирался подробно с возможностью групповых политик под samba4…
Итак, samba4 установлена и запущена. Теперь – черёд аутенфикации пользователей AD в Linux
Настройка Winbind
Идём в документацию Wiki Samba4/Winbind и делаем ВСЁ-ВСЁ-ВСЁ, что там написано. Не забываем сделать рестарт системы после внесения изменений в /etc/nsswitch.conf, ибо… В общем, нужна перезагрузка. Аккуратней с файлами в /etc/pam.d/, потому что если ошибётесь – у вас сервер превратится в «чёрный ящик», т.к. зайти уже на него не сможете ни по ssh, ни с консоли… Ежели сделали всё без ошибок – вуаля, можете теперь логиниться на Linux-сервере под аккаунтами пользователей Active Directory!
Впрочем, давайте я ещё раз перечислю необходимые действия и приведу все свои (рабочие!) конфигурационные файлы, чтобы всё было в одном месте.
Итак.
Делаем доступной библиотеку libnss_winbind.so:
# ln -s /usr/local/samba/lib/libnss_winbind.so.2 /lib/libnss_winbind.so # ln -s /lib/libnss_winbind.so /lib/libnss_winbind.so.2 Правим /etc/nsswitch.conf:
# /etc/nsswitch.conf
passwd: compat winbind group: compat winbind shadow: compat hosts: files dns networks: files protocols: db files services: db files ethers: db files rpc: db files netgroup: nis Вот после этой правки сразу же перегрузитесь!
Тестируем winbind. Да, не смущайтесь, что такого процесса в системе нет – демон samba теперь выполняет все функции.
Доступность winbind:
$ /usr/local/samba/bin/wbinfo -p Ping to winbindd succeeded Winbind возвращает список пользователей домена:
$ /usr/local/samba/bin/wbinfo -u ... <ВАШ_ДОМЕН>\Administrator ... getent passwd даёт список ВСЕХ пользователей –и линуксовых, и доменных:
$ getent passwd root:x:0:0… ... <ВАШ_ДОМЕН>\Administrator:x:0:100::/home/MATWS/Administrator:/bin/false ... Команда id возвращает информацию о пользователях домена:
$ id Administrator uid=0(root) gid=100(users) groupes=0(root),100(users),3000004(Group Policy Creator Owners),3000008(Domain Admins) Обратите внимание, что созданный на этапе «заготовки» samba4 доменный пользователь Administrator имеет uid=0 со всеми вытекающими отсюда последствиями!
Настройка pam
Прежде всего, делаем доступной библиотеку pam_winbind.so:
# ln -s /usr/local/samba/lib/security/pam_winbind.so /lib/security Настраиваем следующие файлы в каталоге /etc/pam.d/:
/etc/pam.d/common-auth
# # /etc/pam.d/common-auth - authentication settings common to all services # # This file is included from other service-specific PAM config files, # and should contain a list of the authentication modules that define # the central authentication scheme for use on the system # (e.g., /etc/shadow, LDAP, Kerberos, etc.). The default is to use the # traditional Unix authentication mechanisms. # # As of pam 1.0.1-6, this file is managed by pam-auth-update by default. # To take advantage of this, it is recommended that you configure any # local modules either before or after the default block, and use # pam-auth-update to manage selection of other modules. See # pam-auth-update(8) for details. # here are the per-package modules (the "Primary" block) auth sufficient pam_winbind.so auth [success=1 default=ignore] pam_unix.so nullok_secure use_first_pass # here's the fallback if no module succeeds auth requisite pam_deny.so # prime the stack with a positive return value if there isn't one already; # this avoids us returning an error just because nothing sets a success code # since the modules above will each just jump around auth required pam_permit.so # and here are more per-package modules (the "Additional" block) # end of pam-auth-update config /etc/pam.d/common-account:
# # /etc/pam.d/common-account - authorization settings common to all services # # This file is included from other service-specific PAM config files, # and should contain a list of the authorization modules that define # the central access policy for use on the system. The default is to # only deny service to users whose accounts are expired in /etc/shadow. # # As of pam 1.0.1-6, this file is managed by pam-auth-update by default. # To take advantage of this, it is recommended that you configure any # local modules either before or after the default block, and use # pam-auth-update to manage selection of other modules. See # pam-auth-update(8) for details. # # here are the per-package modules (the "Primary" block) account sufficient pam_winbind.so account [success=1 new_authtok_reqd=done default=ignore] pam_unix.so # here's the fallback if no module succeeds account requisite pam_deny.so # prime the stack with a positive return value if there isn't one already; # this avoids us returning an error just because nothing sets a success code # since the modules above will each just jump around account required pam_permit.so # and here are more per-package modules (the "Additional" block) # end of pam-auth-update config /etc/pam.d/common-session:
# # /etc/pam.d/common-session - session-related modules common to all services # # This file is included from other service-specific PAM config files, # and should contain a list of modules that define tasks to be performed # at the start and end of sessions of *any* kind (both interactive and # non-interactive). # # As of pam 1.0.1-6, this file is managed by pam-auth-update by default. # To take advantage of this, it is recommended that you configure any # local modules either before or after the default block, and use # pam-auth-update to manage selection of other modules. See # pam-auth-update(8) for details. # here are the per-package modules (the "Primary" block) session [default=1] pam_permit.so # here's the fallback if no module succeeds session requisite pam_deny.so # prime the stack with a positive return value if there isn't one already; # this avoids us returning an error just because nothing sets a success code # since the modules above will each just jump around session required pam_permit.so # The pam_umask module will set the umask according to the system default in # /etc/login.defs and user settings, solving the problem of different # umask settings with different shells, display managers, remote sessions etc. # See "man pam_umask". session required pam_mkhomedir.so session required pam_winbind.so session optional pam_umask.so # and here are more per-package modules (the "Additional" block) session required pam_unix.so session optional pam_ck_connector.so nox11 # end of pam-auth-update config Вот теперь у вас появилась возможность логиниться на Linux-компе под пользователем домена!
Freeradius
Следующий этап – установка и настройка freeradius-сервера, настройка pptpd для работы в связке с freeradius с использованием данных Active Directory и протоколов MS-CHAP v2 и MPPE-128. И не верьте тому, что для реализации MS-CHAP v2 надо использовать samba3 или, что ещё круче – разнести samba4 и radius-сервер по разным машинам!
Итак, в качестве отправной точки опять будем использовать WiKi Samba4/HOWTO/Virtual_Private_Network. Но не буквально. Приступаем.
Устанвливаем freeradius:
sudo apt-get install freeradius freeradius-common freeradius-krb5 freeradius-ldap freeradius-utils radiusclient1 Обратите внимание, что по сравнению с упомянутой статьёй на WiKi, здесь добавлена установка пакета radiusclient1, который будет необходим для работы pptpd с плагинами радиуса.
Конфигурируем freeradius. У меня это /etc/freeradius/radiusd.conf:
prefix = /usr exec_prefix = /usr sysconfdir = /etc localstatedir = /var sbindir = ${exec_prefix}/sbin logdir = /var/log/freeradius raddbdir = /etc/freeradius radacctdir = ${logdir}/radacct confdir = ${raddbdir} run_dir = ${localstatedir}/run/freeradius db_dir = ${raddbdir} libdir = /usr/lib/freeradius pidfile = ${run_dir}/freeradius.pid max_request_time = 30 cleanup_delay = 5 max_requests = 1024 listen { type = auth ipaddr = <ip_address_интерфейса> # где будем слушать port = 0 interface = eth0 } listen { type = auth ipaddr = 127.0.0.1 port = 0 interface = lo } listen { type = acct ipaddr = <ip_address_интерфейса> port = 0 interface = eth0 } listen { type = acct ipaddr = 127.0.0.1 port = 0 interface = lo } #если есть еще интерфейсы, которые будут задействованы, то повторить для них #listen { type = auth …} и listen {type = acct …} hostname_lookups = no allow_core_dumps = no regular_expressions = yes extended_expressions = yes log { destination = files file = ${logdir}/radius.log syslog_facility = daemon stripped_names = no auth = no auth_badpass = no auth_goodpass = no } checkrad = ${sbindir}/checkrad security { max_attributes = 200 reject_delay = 1 status_server = yes } proxy_requests = no $INCLUDE clients.conf thread pool { start_servers = 5 max_servers = 32 min_spare_servers = 3 max_spare_servers = 10 max_requests_per_server = 0 } modules { $INCLUDE ${confdir}/modules/ } instantiate { exec expr expiration logintime } $INCLUDE policy.conf $INCLUDE sites-enabled/ Далее, в /etc/freeradius/clients.conf пишем:
client localhost { ipaddr = 127.0.0.1 netmask = 32 secret = samba4 # это ваш «секрет» для общения клиента с сервером shortname = localhost } Удаляем возможность работы inner-tunnel, который требует EAP-TTLS и PEAP:
sudo rm -rf /etc/freeradius/sites-enabled/inner-tunnel Теперь в каталоге /etc/freeradius/sites-enabled/ остался default, который мы и редактируем:
authorize { preprocess auth_log chap mschap #suffix # я убрал использование этого модуля, т.к. и без него все ок ldap expiration logintime pap } authenticate { Auth-Type PAP { pap } Auth-Type CHAP { chap } Auth-Type MS-CHAP { mschap } Auth-Type LDAP { ldap } } preacct { preprocess acct_unique suffix files } accounting { detail radutmp attr_filter.accounting_response } session { radutmp } post-auth { exec Post-Auth-Type REJECT { attr_filter.access_reject } } pre-proxy { } post-proxy { } Переходим в каталог /etc/freeradius/modules/ и редактируем необходимые модули.
Файл /etc/freeradius/modules/ldap (заменяя все cn и dc на ваши):
ldap { server = "localhost" identity = "cn=VPN,cn=users,dc=example,dc=com" # пользователь в ldap # который имеет право читать базу password = <пароль_этого_пользователя> basedn = "dc=example,dc=com" filter = "(sAMAccountName=%{Stripped-User-Name:-%{User-Name}})" ldap_connections_number = 5 timeout = 4 timelimit = 3 net_timeout = 1 tls { start_tls = no } access_attr = "msNPAllowDialin" dictionary_mapping = ${confdir}/ldap.attrmap edir_account_policy_check = no # про два последних параметра в руководстве на WiKi забыли, а # без них этот модуль с Active Directory работать не будет! chase-referrals = yes rebind = yes } Редактируем /etc/freeradius/modules/mschap:
mschap { use_mppe = yes (для поддержки mppe-128) require_encryption = yes require_strong = yes with_ntdomain_hack = no # и вот тут-то – главная хитрющая хитрость!!! ntlm_auth = "/usr/local/samba/bin/ntlm_auth3 --request-nt-key \ --username=%{Stripped-User-Name:-%{User-Name:-None}} \ --challenge=%{mschap:Challenge:-00} \ --nt-response=%{mschap:NT-Response:-00}" } Ещё раз обращу ваше внимание на параметр ntlm_auth = "/usr/local/samba/bin/ntlm_auth3…” Samba4 «дружит» с samba3 и кроме бинарника ntlm_auth, который не поддерживает MS-CHAP v2, есть бинарник ntlm_auth3, который всё это «тащит»!
PPTPD
И, наконец – pptpd. Подразумевается, что сам pptpd у вас уже установлен и настроен (файл /etc/pptpd.conf править не надо!)
Правим /etc/ppp/pptpd-options:
############################################################################### # $Id: pptpd-options 4643 2006-11-06 18:42:43Z rene $ # # Sample Poptop PPP options file /etc/ppp/pptpd-options # Options used by PPP when a connection arrives from a client. # This file is pointed to by /etc/pptpd.conf option keyword. # Changes are effective on the next connection. See "man pppd". # # You are expected to change this file to suit your system. As # packaged, it requires PPP 2.4.2 and the kernel MPPE module. ############################################################################### # Authentication # Name of the local system for authentication purposes # (must match the second field in /etc/ppp/chap-secrets entries) name pptpd # Optional: domain name to use for authentication # # Strip the domain prefix from the username before authentication. # (applies if you use pppd with chapms-strip-domain patch) #chapms-strip-domain # Encryption # Debian: on systems with a kernel built with the package # kernel-patch-mppe >= 2.4.2 and using ppp >= 2.4.2, ... refuse-pap refuse-chap refuse-mschap # Require the peer to authenticate itself using MS-CHAPv2 [Microsoft # Challenge Handshake Authentication Protocol, Version 2] authentication. require-mschap-v2 # Require MPPE 128-bit encryption # (note that MPPE requires the use of MSCHAP-V2 during authentication) require-mppe-128 # Network and Routing # If pppd is acting as a server for Microsoft Windows clients, this # option allows pppd to supply one or two DNS (Domain Name Server) # addresses to the clients. The first instance of this option # specifies the primary DNS address; the second instance (if given) # specifies the secondary DNS address. # Attention! This information may not be taken into account by a Windows # client. See KB311218 in Microsoft's knowledge base for more information. ms-dns <ip_dns> # в моем случае – это 127.0.0.1 # If pppd is acting as a server for Microsoft Windows or "Samba" # clients, this option allows pppd to supply one or two WINS (Windows # Internet Name Services) server addresses to the clients. The first # instance of this option specifies the primary WINS address; the # second instance (if given) specifies the secondary WINS address. ms-wins <ip_wins> # то же самое – 127.0.0.1 # Add an entry to this system's ARP [Address Resolution Protocol] # table with the IP address of the peer and the Ethernet address of this # system. This will have the effect of making the peer appear to other # systems to be on the local ethernet. # (you do not need this if your PPTP server is responsible for routing # packets to the clients -- James Cameron) proxyarp # Debian: do not replace the default route nodefaultroute # Logging # Enable connection debugging facilities. # (see your syslog configuration for where pppd sends to) debug # Print out all the option values which have been set. # (often requested by mailing list to verify options) #dump # Miscellaneous # Create a UUCP-style lock file for the pseudo-tty to ensure exclusive # access. lock # Disable BSD-Compress compression nobsdcomp auth logfile /var/log/pptpd.log # для работы с radius добавляем эти два плагина plugin radius.so plugin radattr.so Файл /etc/radiusclien/radiusclient.conf (по-моему, я его не трогал, разве что поправил authserver и acctserver):
# General settings # specify which authentication comes first respectively which # authentication is used. possible values are: "radius" and "local". # if you specify "radius,local" then the RADIUS server is asked # first then the local one. if only one keyword is specified only # this server is asked. auth_order radius,local # maximum login tries a user has login_tries 4 # timeout for all login tries # if this time is exceeded the user is kicked out login_timeout 60 # name of the nologin file which when it exists disables logins. # it may be extended by the ttyname which will result in # a terminal specific lock (e.g. /etc/nologin.ttyS2 will disable # logins on /dev/ttyS2) nologin /etc/nologin # name of the issue file. it's only display when no username is passed # on the radlogin command line issue /etc/radiusclient/issue # RADIUS settings # RADIUS server to use for authentication requests. this config # item can appear more then one time. if multiple servers are # defined they are tried in a round robin fashion if one # server is not answering. # optionally you can specify a the port number on which is remote # RADIUS listens separated by a colon from the hostname. if # no port is specified /etc/services is consulted of the radius # service. if this fails also a compiled in default is used. authserver localhost # RADIUS server to use for accouting requests. All that I # said for authserver applies, too. # acctserver localhost # file holding shared secrets used for the communication # between the RADIUS client and server servers /etc/radiusclient/servers # dictionary of allowed attributes and values # just like in the normal RADIUS distributions dictionary /etc/radiusclient/dictionary # program to call for a RADIUS authenticated login login_radius /usr/sbin/login.radius # file which holds sequence number for communication with the # RADIUS server seqfile /var/run/radius.seq # file which specifies mapping between ttyname and NAS-Port attribute mapfile /etc/radiusclient/port-id-map # default authentication realm to append to all usernames if no # realm was explicitly specified by the user # the radiusd directly form Livingston doesnt use any realms, so leave # it blank then default_realm # time to wait for a reply from the RADIUS server radius_timeout 10 # resend request this many times before trying the next server radius_retries 3 # LOCAL settings # program to execute for local login # it must support the -f flag for preauthenticated login login_local /bin/login Файл /etc/radiusclien/server:
# Make sure that this file is mode 600 (readable only to owner)! # #Server Name or Client/Server pair Key #---------------- --------------- 127.0.0.1 samba4 # помните тот «секрет», что прописали в настройках freeradius? Очень важный момент – создаём файл /etc/radiusclient/dictionary.microsoft. Приводить его текст не буду, т.к. получить его целиком можно вот здесь )
И в конец файла /etc/radiusclient/dictionary дописываете строчку
INCLUDE /etc/radiusclient/dictionary.microsoft, чтобы получилось следующее:
# # Updated 97/06/13 to livingston-radius-2.01 miquels@cistron.nl # # This file contains dictionary translations for parsing # requests and generating responses. All transactions are # composed of Attribute/Value Pairs. The value of each attribute # is specified as one of 4 data types. Valid data types are: # # string - 0-253 octets # ipaddr - 4 octets in network byte order # integer - 32 bit value in big endian order (high byte first) # date - 32 bit value in big endian order - seconds since # 00:00:00 GMT, Jan. 1, 1970 # # Enumerated values are stored in the user file with dictionary # VALUE translations for easy administration. # # Example: # # ATTRIBUTE VALUE # --------------- ----- # Framed-Protocol = PPP # 7 = 1 (integer encoding) # # # Following are the proper new names. Use these. # # далее стандартный текст файла # !!!! Это надо дописать в конце файла!!!!! INCLUDE /etc/radiusclient/dictionary.microsoft Кажется, всё. Samba4 у вас уже запущена, надо рестартовать freeradius-сервер и демон pptpd.
Решение проблемы с отсутствием вкладки «Dial-in» в оснастке ADUC
Ах, да. По поводу того, как разрешить/запретить доступ по VPN определённым пользователям. Вы ведь установили пакет Windows Remote Administration Tools? Так вот, ту картинку оснастки ADUC, что приведена на страничках WiKi под Windows 7 с вкладкой «Dial-in», вы не увидите. А увидите вы нечто подобное:

И где же тут вкладка «Dial-in» или её русский аналог «Входящие звонки»? Как тут управлять разрешениями пользователей? Ничего страшного. Мы же не боимся трудностей? Вспоминаем (думаю – вы и не забывали!) о том, что контроллер домена – это, помимо прочего, ещё и LDAP-сервер, поэтому ставим любой инструментарий по управлению таким сервером (например, LdapAdmin) – и рулим им.
Для начала настраиваем соединение с нашим samba4-сервером: прописываем адрес сервера, давим на кнопочку «Fetch DNs», выбираем базу самого верхнего уровня, radio-box «GSS-API», в качестве пользователя –Administrator, пароль этого пользователя и коннектимся. Видим весь наш каталог, что наваяли при развертывании домена. Выбираем необходимого пользователя и заходим в режим редактирования. Находим атрибут msNPAllowDialin и вписывае TRUE или FALSE (обязательно – заглавными буквами!):
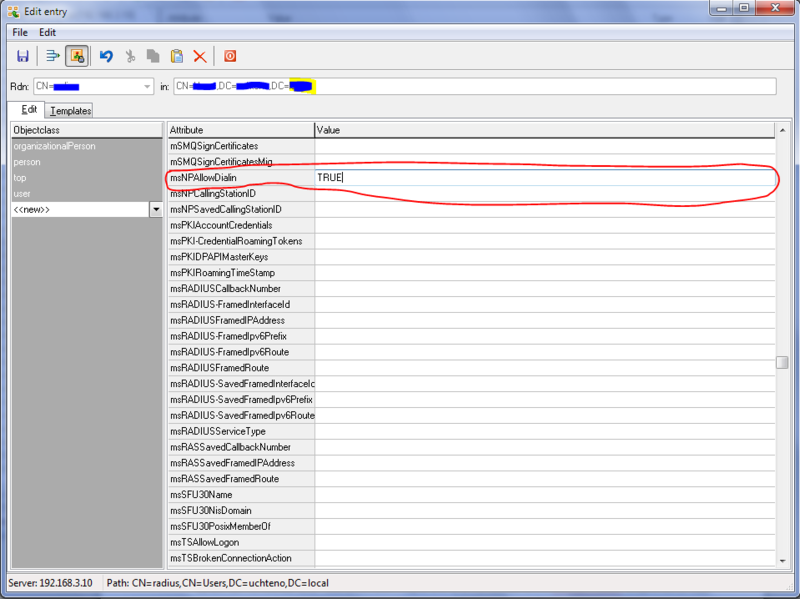
Сохраняем. Данному пользователю разрешено (или запрещено) заходить по VPN.
Итоги
По-моему, все поставленные в начале поста задачи решены. Время, затраченное на их решение (около двух с половиной недель) прежде всего было потрачено на изучение документации в Интернет, опыта подобных решений, сопоставление полученной информации с реалиями, кои я видел своими глазами на нашем сервере, компиляцию-перекомпиляцию samba4, и редактирование, редактирование и ещё раз редактирование конфигов… Но результат меня порадовал: в итоге получилась почти полноценная замена Windows Server 2008 R2 c Active Directory, службой политики сети и доступа и службой удалённого рабочего стола (под wine, конечно, но об этом ни слова не написал).
ссылка на оригинал статьи http://habrahabr.ru/post/157019/
Добавить комментарий