- Android File Dialog – почти все ссылки из stackoverflow ведут сюда. В принципе, неплохое решение, но реализовано через отдельную activity, а хотелось чего-то в духе OpenFileDialog’а из .Net.
- В данной статье речь идет вообще об отдельном файл-менеджере, и почерпнуть какие-то идеи из неё не удалось.
- Идея же отсюда очень понравилась, однако, как мне показалось реализовать все это можно несколько красивее.
В результате, начав реализовывать своё решение, я столкнулся с некоторыми трудностями решать которые показалось очень интересно. А посему, решил описать в данной статье не просто готовое решение, а все шаги, которые к нему привели. Желающие пройти их вместе –
Итак, приступим! В любой привычной среде (я использую IntelliJ IDEA) создадим новое приложение. На главной activity расположим одну единственную кнопку и напишем к ней, пока пустой, обработчик нажатия:
public void OnOpenFileClick(View view) { } Создадим новый класс с конструктором:
import android.app.AlertDialog; import android.content.Context; public class OpenFileDialog extends AlertDialog.Builder { public OpenFileDialog(Context context) { super(context); setPositiveButton(android.R.string.ok, null) .setNegativeButton(android.R.string.cancel, null); } } а в обработчике кнопки вызовем диалог:
OpenFileDialog fileDialog = new OpenFileDialog(this); fileDialog.show(); Кнопки показались, теперь надо бы и сами файлы найти. Начнем поиск с корня sdcard, для чего определим поле:
private String currentPath = Environment.getExternalStorageDirectory().getPath(); и реализуем следующий метод:
private String[] getFiles(String directoryPath){ File directory = new File(directoryPath); File[] files = directory.listFiles(); String[] result = new String[files.length]; for (int i = 0; i < files.length; i++) { result[i] = files[i].getName(); } return result; } (так как главное требование к классу – работать сразу у любого разработчика, без подключения дополнительных библиотек, — то никаких google-collections использовать не будем, и с массивами приходится работать по старинке), а в конструкторе к вызову setNegativeButton добавим .setItems(getFiles(currentPath), null).
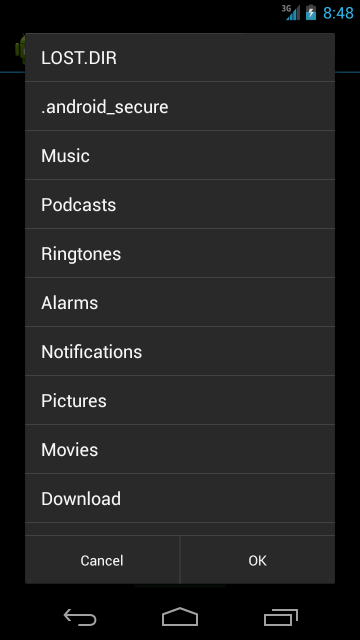
Что же, неплохо, однако файлы не отсортированы. Реализуем для этого дела Adapter как внутренний класс, заменим setItems на setAdapter и немного перепишем getFiles:
private class FileAdapter extends ArrayAdapter<File> { public FileAdapter(Context context, List<File> files) { super(context, android.R.layout.simple_list_item_1, files); } @Override public View getView(int position, View convertView, ViewGroup parent) { TextView view = (TextView) super.getView(position, convertView, parent); File file = getItem(position); view.setText(file.getName()); return view; } }
.setAdapter(new FileAdapter(context, getFiles(currentPath)), null)
private List<File> getFiles(String directoryPath){ File directory = new File(directoryPath); List<File> fileList = Arrays.asList(directory.listFiles()); Collections.sort(fileList, new Comparator<File>() { @Override public int compare(File file, File file2) { if (file.isDirectory() && file2.isFile()) return -1; else if (file.isFile() && file2.isDirectory()) return 1; else return file.getPath().compareTo(file2.getPath()); } }); return fileList; } Еще лучше, но нам надо по клику на папке идти внутрь. Как достучаться до встроенного listview я не нашел, а просто подменил его собственным. Плюс, изменения adapter’а внутри обработчика listview вызывало exception, и список файлов пришлось вынести в отдельное поле:
private List<File> files = new ArrayList<File>(); public OpenFileDialog(Context context) { super(context); files.addAll(getFiles(currentPath)); ListView listView = createListView(context); listView.setAdapter(new FileAdapter(context, files)); setView(listView) .setPositiveButton(android.R.string.ok, null) .setNegativeButton(android.R.string.cancel, null); } private void RebuildFiles(ArrayAdapter<File> adapter) { files.clear(); files.addAll(getFiles(currentPath)); adapter.notifyDataSetChanged(); } private ListView createListView(Context context) { ListView listView = new ListView(context); listView.setOnItemClickListener(new AdapterView.OnItemClickListener() { @Override public void onItemClick(AdapterView<?> adapterView, View view, int index, long l) { final ArrayAdapter<File> adapter = (FileAdapter) adapterView.getAdapter(); File file = adapter.getItem(index); if (file.isDirectory()) { currentPath = file.getPath(); RebuildFiles(adapter); } } }); return listView; } Отлично, вот только нажав на папку Android мы получаем список всего из одного каталога data, и наше окно тут же уменьшается в размере.
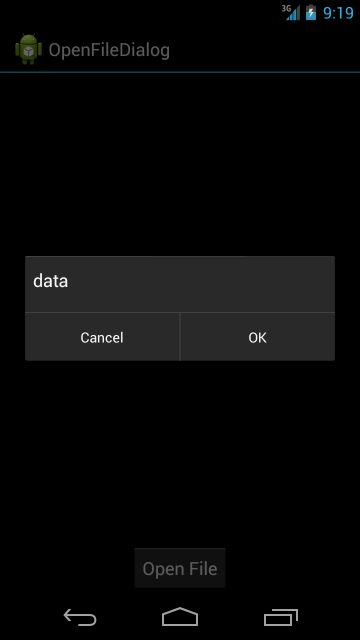
Возможно это нормально, но мне это не понравилось, и я стал искать возможности размер сохранить. Единственный найденный мною вариант – это установка setMinimumHeight. Установка этого свойства для listview вызвала дополнительные проблемы, но они решились оберткой его в LinearLayout:
public OpenFileDialog(Context context) { super(context); LinearLayout linearLayout = createMainLayout(context); files.addAll(getFiles(currentPath)); ListView listView = createListView(context); listView.setAdapter(new FileAdapter(context, files)); linearLayout.addView(listView); setView(linearLayout) .setPositiveButton(android.R.string.ok, null) .setNegativeButton(android.R.string.cancel, null); } private LinearLayout createMainLayout(Context context) { LinearLayout linearLayout = new LinearLayout(context); linearLayout.setOrientation(LinearLayout.VERTICAL); linearLayout.setMinimumHeight(750); return linearLayout; } Результат, все равно получился немного не таким, каким хотелось бы: при старте диалог развернут на весь экран, а после перехода в каталог Android – уменьшается до 750px. Да еще и экраны разных устройств имеют разную высоту. Решим сразу обе этих проблемы, установив setMinimumHeight в максимально возможную для текущего экрана:
private static Display getDefaultDisplay(Context context) { return ((WindowManager)context.getSystemService(Context.WINDOW_SERVICE)).getDefaultDisplay(); } private static Point getScreenSize(Context context) { Point screeSize = new Point(); getDefaultDisplay(context).getSize(screeSize); return screeSize; } private static int getLinearLayoutMinHeight(Context context) { return getScreenSize(context).y; } private LinearLayout createMainLayout(Context context) { LinearLayout linearLayout = new LinearLayout(context); linearLayout.setOrientation(LinearLayout.VERTICAL); linearLayout.setMinimumHeight(getLinearLayoutMinHeight(context)); return linearLayout; } Не нужно пугаться того, что мы устанавливаем в setMinimumHeight полный размер экрана, сама система уменьшит значение до максимально допустимого.
Теперь появляется проблема понимания пользователя, в каком каталоге он сейчас находится, и возврата вверх. Давайте разберемся с первой. Вроде все легко — установить значение title в currentPath и менять его при изменении последнего. Добавим в конструктор и в метод RebuildFiles вызов setTitle(currentPath).
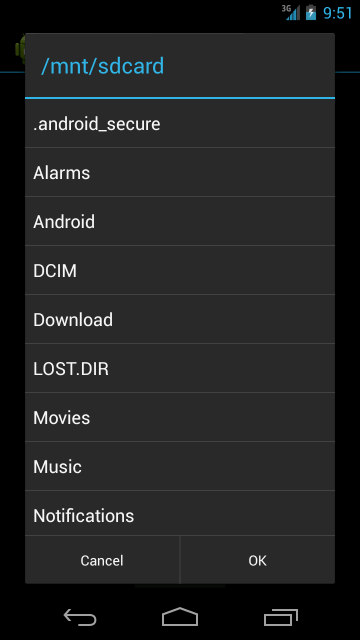
Вроде все хорошо. Перейдем в каталог Android:
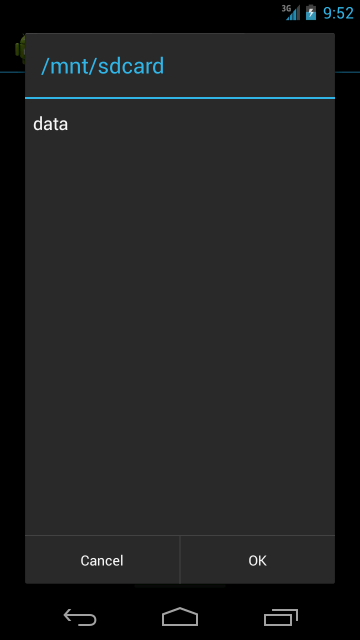
А нет – заголовок не изменился. Почему не срабатывает setTitle после показа диалога, документация молчит. Однако мы может это исправить, создав свой заголовок и подменив им стандартный:
private TextView title; public OpenFileDialog(Context context) { super(context); title = createTitle(context); LinearLayout linearLayout = createMainLayout(context); files.addAll(getFiles(currentPath)); ListView listView = createListView(context); listView.setAdapter(new FileAdapter(context, files)); linearLayout.addView(listView); setCustomTitle(title) .setView(linearLayout) .setPositiveButton(android.R.string.ok, null) .setNegativeButton(android.R.string.cancel, null); } private int getItemHeight(Context context) { TypedValue value = new TypedValue(); DisplayMetrics metrics = new DisplayMetrics(); context.getTheme().resolveAttribute(android.R.attr.rowHeight, value, true); getDefaultDisplay(context).getMetrics(metrics); return (int)TypedValue.complexToDimension(value.data, metrics); } private TextView createTitle(Context context) { TextView textView = new TextView(context); textView.setTextAppearance(context, android.R.style.TextAppearance_DeviceDefault_DialogWindowTitle); int itemHeight = getItemHeight(context); textView.setLayoutParams(new ViewGroup.LayoutParams(ViewGroup.LayoutParams.MATCH_PARENT, itemHeight)); textView.setMinHeight(itemHeight); textView.setGravity(Gravity.CENTER_VERTICAL); textView.setPadding(15, 0, 0, 0); textView.setText(currentPath); return textView; } private void RebuildFiles(ArrayAdapter<File> adapter) { files.clear(); files.addAll(getFiles(currentPath)); adapter.notifyDataSetChanged(); title.setText(currentPath); } И снова не все ладно: если пройти достаточно далеко, то строка в заголовок влезать не будет
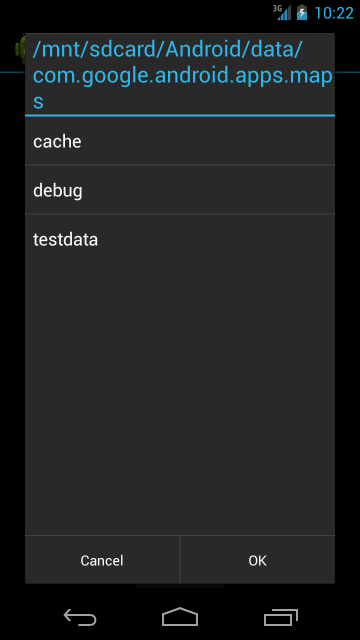
Решение с установкой setMaximumWidth не верно, так как пользователь будет видеть только начало длинного пути. Не знаю, насколько верно мое решение, но я сделал так:
public int getTextWidth(String text, Paint paint) { Rect bounds = new Rect(); paint.getTextBounds(text, 0, text.length(), bounds); return bounds.left + bounds.width() + 80; } private void changeTitle() { String titleText = currentPath; int screenWidth = getScreenSize(getContext()).x; int maxWidth = (int) (screenWidth * 0.99); if (getTextWidth(titleText, title.getPaint()) > maxWidth) { while (getTextWidth("..." + titleText, title.getPaint()) > maxWidth) { int start = titleText.indexOf("/", 2); if (start > 0) titleText = titleText.substring(start); else titleText = titleText.substring(2); } title.setText("..." + titleText); } else { title.setText(titleText); } } Решим теперь проблему с возвратом. Это достаточно легко, учитывая, что у нас есть LinearLayout. Добавим в него еще один TextView и немного отрефракторим код:
private ListView listView; public OpenFileDialog(Context context) { super(context); title = createTitle(context); changeTitle(); LinearLayout linearLayout = createMainLayout(context); linearLayout.addView(createBackItem(context)); files.addAll(getFiles(currentPath)); listView = createListView(context); listView.setAdapter(new FileAdapter(context, files)); linearLayout.addView(listView); setCustomTitle(title) .setView(linearLayout) .setPositiveButton(android.R.string.ok, null) .setNegativeButton(android.R.string.cancel, null); } private TextView createTextView(Context context, int style) { TextView textView = new TextView(context); textView.setTextAppearance(context, style); int itemHeight = getItemHeight(context); textView.setLayoutParams(new ViewGroup.LayoutParams(ViewGroup.LayoutParams.MATCH_PARENT, itemHeight)); textView.setMinHeight(itemHeight); textView.setGravity(Gravity.CENTER_VERTICAL); textView.setPadding(15, 0, 0, 0); return textView; } private TextView createTitle(Context context) { TextView textView = createTextView(context, android.R.style.TextAppearance_DeviceDefault_DialogWindowTitle); return textView; } private TextView createBackItem(Context context) { TextView textView = createTextView(context, android.R.style.TextAppearance_DeviceDefault_Small); Drawable drawable = getContext().getResources().getDrawable(android.R.drawable.ic_menu_directions); drawable.setBounds(0, 0, 60, 60); textView.setCompoundDrawables(drawable, null, null, null); textView.setLayoutParams(new ViewGroup.LayoutParams(ViewGroup.LayoutParams.MATCH_PARENT, ViewGroup.LayoutParams.WRAP_CONTENT)); textView.setOnClickListener(new View.OnClickListener() { @Override public void onClick(View view) { File file = new File(currentPath); File parentDirectory = file.getParentFile(); if (parentDirectory != null) { currentPath = parentDirectory.getPath(); RebuildFiles(((FileAdapter) listView.getAdapter())); } } }); return textView; } Возможность возвращаться на шаг вверх, может привести пользователя в каталоги, к которым ему доступ запрещен, поэтому изменим функцию RebuildFiles:
private void RebuildFiles(ArrayAdapter<File> adapter) { try{ List<File> fileList = getFiles(currentPath); files.clear(); files.addAll(fileList); adapter.notifyDataSetChanged(); changeTitle(); } catch (NullPointerException e){ Toast.makeText(getContext(), android.R.string.unknownName, Toast.LENGTH_SHORT).show(); } } (cообщение пока не очень информативное, но вскоре мы добавим разработчику возможность исправить это).
Ни один OpenFileDialog не обходится без фильтра. Добавим и его:
private FilenameFilter filenameFilter; public OpenFileDialog setFilter(final String filter) { filenameFilter = new FilenameFilter() { @Override public boolean accept(File file, String fileName) { File tempFile = new File(String.format("%s/%s", file.getPath(), fileName)); if (tempFile.isFile()) return tempFile.getName().matches(filter); return true; } }; return this; }
List<File> fileList = Arrays.asList(directory.listFiles(filenameFilter));
new OpenFileDialog(this).setFilter(".*\\.txt"); Обратите внимание — фильтр принимает регулярное выражение. Казалось бы – все хорошо, но первая выборка файлов сработает в конструкторе, до присвоения фильтра. Перенесем её в переопределенный метод show:
public OpenFileDialog(Context context) { super(context); title = createTitle(context); changeTitle(); LinearLayout linearLayout = createMainLayout(context); linearLayout.addView(createBackItem(context)); listView = createListView(context); linearLayout.addView(listView); setCustomTitle(title) .setView(linearLayout) .setPositiveButton(android.R.string.ok, null) .setNegativeButton(android.R.string.cancel, null); } @Override public AlertDialog show() { files.addAll(getFiles(currentPath)); listView.setAdapter(new FileAdapter(getContext(), files)); return super.show(); } Осталось совсем чуть-чуть: вернуть выбранный файл. Опять же, я так и не понял зачем нужно устанавливать CHOICE_MODE_SINGLE, а потом все равно писать лишний код для подсветки выбранного элемента, когда он (код) и так будет работать без CHOICE_MODE_SINGLE, а потому обойдемся без него:
private int selectedIndex = -1;
@Override public View getView(int position, View convertView, ViewGroup parent) { TextView view = (TextView) super.getView(position, convertView, parent); File file = getItem(position); view.setText(file.getName()); if (selectedIndex == position) view.setBackgroundColor(getContext().getResources().getColor(android.R.color.holo_blue_light)); else view.setBackgroundColor(getContext().getResources().getColor(android.R.color.background_dark)); return view; }
private void RebuildFiles(ArrayAdapter<File> adapter) { try{ List<File> fileList = getFiles(currentPath); files.clear(); selectedIndex = -1; files.addAll(fileList); adapter.notifyDataSetChanged(); changeTitle(); } catch (NullPointerException e){ Toast.makeText(getContext(), android.R.string.unknownName, Toast.LENGTH_SHORT).show(); } } private ListView createListView(Context context) { ListView listView = new ListView(context); listView.setOnItemClickListener(new AdapterView.OnItemClickListener() { @Override public void onItemClick(AdapterView<?> adapterView, View view, int index, long l) { final ArrayAdapter<File> adapter = (FileAdapter) adapterView.getAdapter(); File file = adapter.getItem(index); if (file.isDirectory()) { currentPath = file.getPath(); RebuildFiles(adapter); } else { if (index != selectedIndex) selectedIndex = index; else selectedIndex = -1; adapter.notifyDataSetChanged(); } } }); return listView; } И создадим интерфейс слушателя:
public interface OpenDialogListener{ public void OnSelectedFile(String fileName); } private OpenDialogListener listener; public OpenFileDialog setOpenDialogListener(OpenDialogListener listener) { this.listener = listener; return this; }
… .setPositiveButton(android.R.string.ok, new DialogInterface.OnClickListener() { @Override public void onClick(DialogInterface dialog, int which) { if (selectedIndex > -1 && listener != null) { listener.OnSelectedFile(listView.getItemAtPosition(selectedIndex).toString()); } } }) … Ну, и изменим вызов:
OpenFileDialog fileDialog = new OpenFileDialog(this) .setFilter(".*\\.csv") .setOpenDialogListener(new OpenFileDialog.OpenDialogListener() { @Override public void OnSelectedFile(String fileName) { Toast.makeText(getApplicationContext(), fileName, Toast.LENGTH_LONG).show(); } }); fileDialog.show(); Несколько улучшений напоследок:
private Drawable folderIcon; private Drawable fileIcon; private String accessDeniedMessage; public OpenFileDialog setFolderIcon(Drawable drawable){ this.folderIcon = drawable; return this; } public OpenFileDialog setFileIcon(Drawable drawable){ this.fileIcon = drawable; return this; } public OpenFileDialog setAccessDeniedMessage(String message) { this.accessDeniedMessage = message; return this; } private void RebuildFiles(ArrayAdapter<File> adapter) { try{ List<File> fileList = getFiles(currentPath); files.clear(); selectedIndex = -1; files.addAll(fileList); adapter.notifyDataSetChanged(); changeTitle(); } catch (NullPointerException e){ String message = getContext().getResources().getString(android.R.string.unknownName); if (!accessDeniedMessage.equals("")) message = accessDeniedMessage; Toast.makeText(getContext(), message, Toast.LENGTH_SHORT).show(); } }
@Override public View getView(int position, View convertView, ViewGroup parent) { TextView view = (TextView) super.getView(position, convertView, parent); File file = getItem(position); view.setText(file.getName()); if (file.isDirectory()) { setDrawable(view, folderIcon); } else { setDrawable(view, fileIcon); if (selectedIndex == position) view.setBackgroundColor(getContext().getResources().getColor(android.R.color.holo_blue_dark)); else view.setBackgroundColor(getContext().getResources().getColor(android.R.color.transparent)); } return view; } private void setDrawable(TextView view, Drawable drawable) { if (view != null){ if (drawable != null){ drawable.setBounds(0, 0, 60, 60); view.setCompoundDrawables(drawable, null, null, null); } else { view.setCompoundDrawables(null, null, null, null); } } } Осталось несколько проблем, которые я пока никак не смог решить, и был бы благодарен за любую помощь:
- Подсветка нажатия на пункт «Вверх». Вроде решается через установку setBackgroundResource значения android.R.drawable.list_selector_background, но это стиль android 2.x, а не holo!
- Цвет выделения файла в зависимости от выбранной пользователем темы.
Так же с удовольствием жду любых замечаний и предложений. Полный код здесь.
ссылка на оригинал статьи http://habrahabr.ru/post/203884/
Добавить комментарий