Как всегда, для начала добавим библиотеку в приложение (файл build.gradle(module.app) ):
implementation 'com.jaredrummler:colorpicker:1.1.0'
С этим разобрались. Теперь приступим непосредственно к реализации выбора цвета.
Создадим разметку:
<?xml version="1.0" encoding="utf-8"?> <RelativeLayout xmlns:android="http://schemas.android.com/apk/res/android" xmlns:app="http://schemas.android.com/apk/res-auto" xmlns:tools="http://schemas.android.com/tools" android:layout_width="match_parent" android:layout_height="match_parent" android:id="@+id/activityMain" tools:context=".MainActivity"> <Button android:id="@+id/firstButton" android:layout_width="match_parent" android:layout_height="wrap_content" android:text="Color picker №1" android:layout_margin="5dp" android:onClick="onClickButton" /> <Button android:id="@+id/secondButton" android:layout_width="match_parent" android:layout_height="wrap_content" android:text="Color picker №2" android:layout_below="@id/firstButton" android:layout_margin="5dp" android:onClick="onClickButton" /> <TextView android:id="@+id/firstText" android:layout_width="wrap_content" android:layout_height="wrap_content" android:layout_centerInParent="true" android:text="First text" android:textSize="40sp" android:textColor="@android:color/black" /> <TextView android:id="@+id/secondText" android:layout_width="wrap_content" android:layout_height="wrap_content" android:text="Second text" android:textSize="40sp" android:layout_below="@+id/firstText" android:layout_centerInParent="true" android:textColor="@android:color/black" /> </RelativeLayout>У нас есть 2 кнопки, по нажатию на которые будет открываться диалоговое окно для выбора цвета. Когда мы выбрали цвет, он будет меняться у двух наших TextView.
Добавим наши поля в MainActivity:
Button firstButton,secondButton; TextView firstText,secondText; private static final int firstId = 1,secondId = 2; // id нужны для реализации метода onColorSelected интерфейса ColorPickerDialogListener … и инициализируем их в onCreate():
firstButton = findViewById(R.id.firstButton); secondButton = findViewById(R.id.secondButton); firstText = findViewById(R.id.firstText); secondText = findViewById(R.id.secondText);ВАЖНО: Также необходимо, чтобы MainActivity реализовывала методы интерфейса ColorPickerDialogListener:

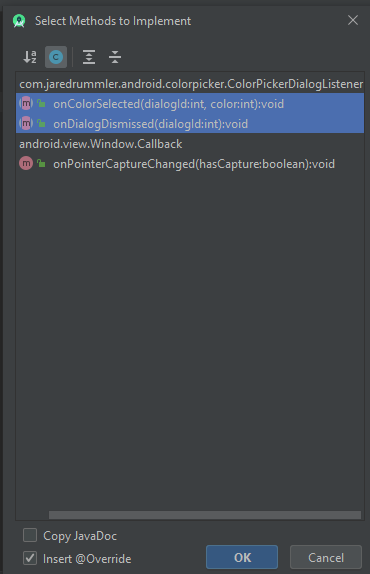
Теперь создадим метод для создания диалогового окна и указаный в XML-разметке метод onClick:
private void createColorPickerDialog(int id) { ColorPickerDialog.newBuilder() .setColor(Color.RED) .setDialogType(ColorPickerDialog.TYPE_PRESETS) .setAllowCustom(true) .setAllowPresets(true) .setColorShape(ColorShape.SQUARE) .setDialogId(id) .show(this); // полный список атрибутов класса ColorPickerDialog смотрите ниже } public void onClickButton(View view) { switch (view.getId()) { case R.id.firstButton: createColorPickerDialog(firstId); break; case R.id.secondButton: createColorPickerDialog(secondId); break; } } 
все атрибуты класса ColorPickerDialog
Также необходимо реализовать методы интерфейса ColorPickerDialogListener:
@Override public void onColorSelected(int dialogId, int color) { switch (dialogId) { // смотрим, какая кнопка нажата case firstId: firstText.setTextColor(color); break; case secondId: secondText.setTextColor(color); break; } } @Override public void onDialogDismissed(int dialogId) { Toast.makeText(this, "Dialog dismissed", Toast.LENGTH_SHORT).show(); }Запускаем и… готово!
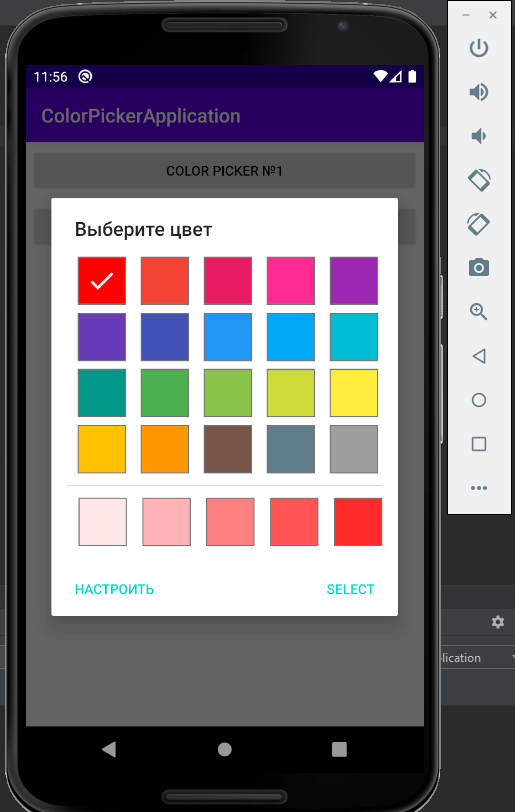

Однако это ещё не все возможности библиотеки ColorPicker. Она также добавляет preference для PreferenceScreen. Это позволяет реализовать выбор цвета в настройках. Посмотрим, как это работает.
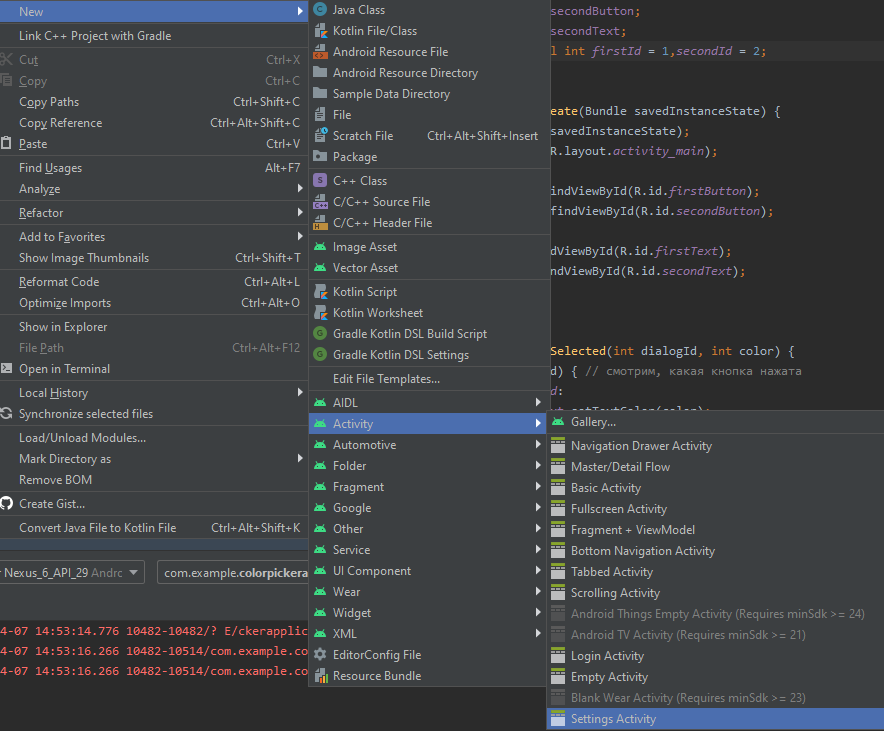
1) Создадим новую SettingsActivity:
2) Откроем файл root_preferences.xml и изменим его следующим образом:
<PreferenceScreen xmlns:app="http://schemas.android.com/apk/res-auto" xmlns:android="http://schemas.android.com/apk/res/android"> <PreferenceCategory app:title="Выбор цвета"> <com.jaredrummler.android.colorpicker.ColorPreferenceCompat android:key="color_picker" app:title="Выберите цвет" /> </PreferenceCategory> </PreferenceScreen> Как видите, мы создали Preference типа ColorPreferenceCompat
3) Создадим в activity_main.xml кнопку для перехода в нашу SettingsActivty:
<Button android:id="@+id/settingsButton" android:layout_width="wrap_content" android:layout_height="wrap_content" android:text="Настройки" android:layout_alignParentBottom="true" android:layout_alignParentRight="true" android:layout_margin="5dp" android:onClick="openSettingsActivity" />4) Создадим метод openSettingsActivity в MainActivity и укажем его в поле «onClick» этой кнопки:
public void openSettingsActivity(View view) { startActivity(new Intent(this,SettingsActivity.class)); }В этой же MainActivity создадим метод, который изменяет её фон в зависимости от выбранного в настройках цвета и вызовем этот метож в onCreate:
private void setBackgroundColorFromSettingsActivity() { SharedPreferences sp = PreferenceManager.getDefaultSharedPreferences(this); //SharedPreferences используется для сохранения настроек //Подробнее - тут: //https://developer.android.com/reference/android/content/SharedPreferences?hl=ru int color = sp.getInt("color_picker",Color.GREEN); RelativeLayout layout = findViewById(R.id.activityMain); layout.setBackgroundColor(color); }Переопределим метод onResume (подробнее тут):
@Override protected void onResume() { setBackgroundColorFromSettingsActivity(); super.onResume(); }5) Запустим приложение и посмотрим, что получилось:

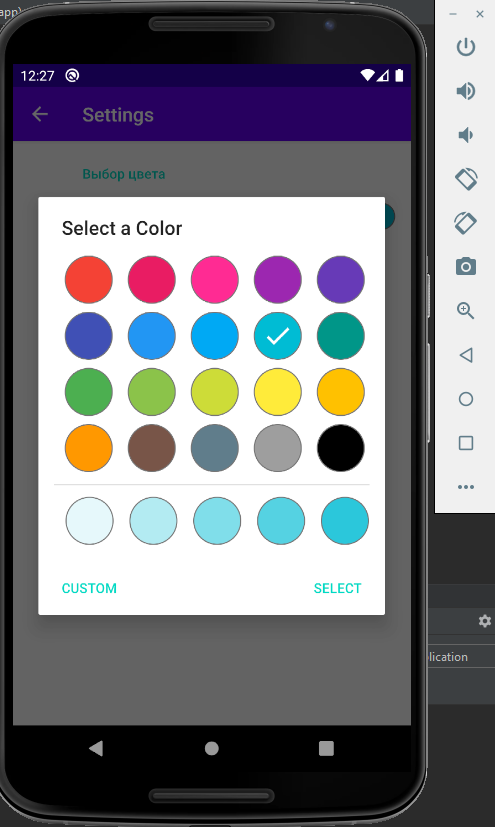
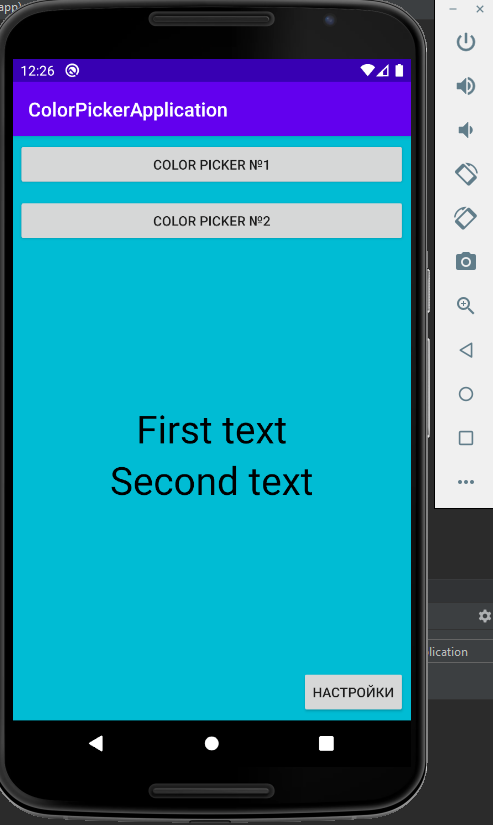
Как видите, все работает корректно.
P.S: Полезные сслыки:
- Код библиотеки на GitHub (оф.документация там же)
- Похожая библиотека(если эта вам чем-то не приглянулась)
P.S.S: Код приложения на GitHub
ссылка на оригинал статьи https://habr.com/ru/post/496136/
Добавить комментарий