Codex on Your Phone: Remote Setup, Test Results, and Code Review
Codex can run commands on your development computer while you control the task from the ChatGPT app on your phone. The project files, installed tools, and running application stay on the computer. The phone gives you a way to send instructions, answer approval requests, and review the result.
I tested this workflow with an image-generator project: inspect the code, choose a small improvement, plan it, run the implementation, and check the tests. Reviewing the interface needed an extra step. The app ran at localhost on my computer, so I asked Codex to capture screenshots I could open on my phone.
This walkthrough covers pairing, execution settings, a focused implementation task, and the checks to make before a commit. The example uses my iPhone; interface labels and availability can differ by app version and workspace.
Watch the screen walkthrough: How to Use Codex on Your Phone.
1. Prepare the host and mobile client
You’ll need:
-
A ChatGPT account and workspace with Codex access.
-
The latest ChatGPT desktop app on your computer.
-
The latest ChatGPT mobile app, signed in to the same account and workspace.
-
A computer that stays awake, online, and running the desktop app.
Get the apps from the official ChatGPT download page. Open Codex on your computer and make sure your project is available there before pairing.
OpenAI’s current remote setup guide lists Mac and Windows hosts, with iOS and Android clients depending on rollout. The phone steps here show my iPhone. Some app versions still call the feature Remote instead of Codex. A workspace admin may also need to enable Remote Control. Check the supported setup and requirements if your menus differ.
You start this setup in the desktop app. Installing only the Codex CLI or IDE extension won’t give you the pairing screen.
2. Pair the devices
On your computer:
-
Open Settings, then Connections.
-
Select Control this PC or Control this Mac.
-
Enable Allow connections if it is off.
-
Click Add. Your version may show Set up instead.
-
Complete any verification and open the pairing QR code.
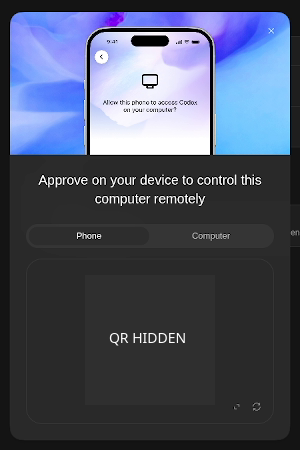
Scan your own code. The code in my recording is hidden.
On your phone, scan the code with the camera. Open the ChatGPT link, check the account and workspace, and approve the connection. Complete any passkey, SSO, or multi-factor authentication prompt it shows.
Each pairing connects a particular device to a particular computer. Repeat setup if you want another phone to control another host. You can manage paired devices in the computer’s Connections settings. Official pairing instructions
Enable Keep this PC awake, or the equivalent option, if available. Leave the desktop app open and your computer connected to power. A sleeping or offline computer can’t do the work you send it.
Now open Codex in the ChatGPT mobile sidebar. Your connected computer should appear. In the video, I also use Face ID or the device passcode to protect access on my phone.
3. Select the execution environment
My mobile home screen has All, Cloud, and a filter for my computer, followed by saved chats.
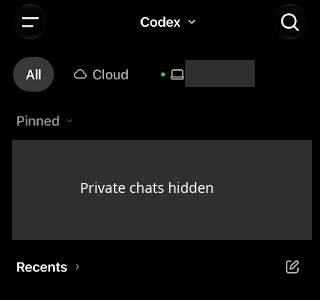
Choose your connected computer for this walkthrough.
Select your computer to use its project files and installed tools. Cloud runs work in a separate cloud environment; it doesn’t automatically have the files sitting on your laptop. For that setup, see my Codex Cloud tutorial. Both options are available through the Codex mobile workflow, subject to account and workspace availability.
Start a new chat and select a project. You may also see Don’t work in a project, but selecting the folder you want to change makes this tutorial easier to follow.
Before sending the first prompt, check the host and project folder. The selected host supplies the files and tools for this task. A dependency installed on another computer won’t help this session. If the project has several services, check its startup instructions before asking Codex to run it.
4. Set permissions and inspect the repository
Open the model controls to choose a model and reasoning effort. In my recording, I use High. You can begin with the available default; matching my exact model isn’t necessary.
Next, open the approval settings. My version shows:
-
Ask for approval: asks before editing external files or using the internet.
-
Approve for me: reviews actions automatically and asks about those detected as potentially unsafe.
-
Full access: gives broader computer access and is marked as elevated risk.
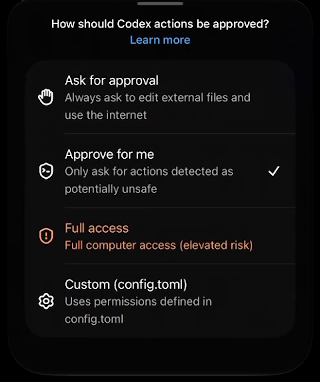
The approval options shown in my demo. Host and workspace policies still apply.
I use Approve for me in the video. Choose the narrowest access that works for your task, and read a requested command before approving it. Automatic review doesn’t make every action harmless.
My first prompt is simple:
Tell me about this repository.
For your first attempt, you can make the request more specific:
Explain what this project does, how to run it, and how to test it.Read its instructions first. Don't change any files yet.
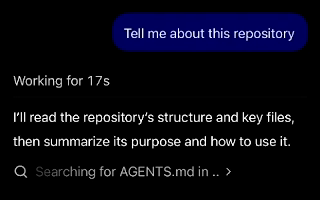
Start by understanding the project before asking for changes.
You can follow progress and expand activity entries to inspect commands. In my recording, Codex looks for AGENTS.md, the file where a project can keep instructions for coding agents. It then summarizes the code and how to run it.
5. Define the scope and completion criteria
My next question is:
How can we improve this repository?
Read the suggestions and choose one manageable change. Asking for every improvement at once makes the result much harder to review on a phone.
In the demo, I ask for a plan with an achievable goal. Codex proposes shared input checks and faster loading of saved image-generation history. The plan includes a goal, scope, checklist, and Done when conditions.
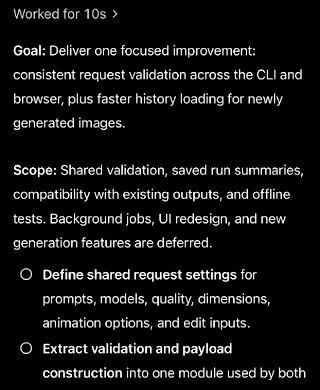
A small scope gives you something concrete to check afterward.
Here’s a reusable version of that request:
Pick one small improvement from your suggestions.Create a plan with a goal, scope, checks, and a clear "Done when."Explain what you will leave out. Don't implement it yet.
You can also enable Plan mode from the plus menu. Pursue goal is useful for an outcome that needs several rounds of work. A written checklist alone doesn’t mean you’ve started a persistent goal. My Codex goal guide explains that workflow.
Once the plan looks right, send:
Implement the plan. Run the relevant tests and tell mewhat passed, what failed, and what still needs a manual check.
While Codex works, use Queue for a follow-up that can wait. Use Steer when you need to correct the current direction. For example, “Keep this change inside the settings page” belongs in the current work, not after a large rewrite. OpenAI explains these controls in its remote engineering guide.
6. Verify behavior and inspect the interface
In my demo, Codex reports that all 11 offline tests pass. It also says browser UI verification is still outstanding. That second sentence is just as useful as the test count.
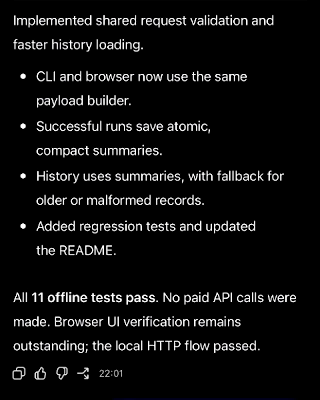
Passing tests and checking the interface are separate parts of the review.
I ask Codex to start the project. It runs on the computer at localhost, using port 8765 in this example.
Opening that address on the phone doesn’t open the computer’s app. Localhost means the device opening the address. On your phone, it points back to your phone.
My workaround is to ask Codex for screenshots. Try:
Open the running app on the computer and take screenshotsat desktop and mobile widths. Show them here so I can reviewthe layout. Check the main interaction and report any errors.
In the recording, Codex uses a headless browser, a browser running without a visible window, to capture the app. The images appear in the chat, where I can open and zoom into them.
Check whether buttons fit, text is readable, and the layout works on a narrow screen. Screenshots show appearance; ask for interaction checks too. If Codex lacks browser tools on your host, it needs that setup before it can capture the app.
7. Review the diff and save a commit
Open Changes to inspect the diff: the lines added, removed, or edited. Use Files when you need more context. Ask Codex to explain anything you don’t understand before committing.
If you expected an existing repository, first check that you selected its correct folder. For a new project, open a terminal in that project’s root and run:
git initgit status
Before the first commit, check .gitignore so secrets such as .env files, dependencies, and generated output stay out of Git. Then ask Codex:
Review the diff and Git status. Commit only the changes forthis task with a short, clear message. Exclude secrets andunrelated files. Don't push yet. Show me the commit hash.
A commit saves a checkpoint in your local Git history. Pushing sends commits to a remote repository such as GitHub. Deploying publishes the application. Treat them as separate steps, so you know exactly what you’ve approved.
Keep the task context manageable
Type / in the composer to see the commands your version supports. The most useful starting points are /plan for planning, /review for checking changes, /side for a side question, and /status for session details. Availability depends on your app, account, and host. Mobile command reference
Attach a screenshot when describing a visual problem. “This button overlaps the title” is much easier to act on when Codex can see it.
Rename chats around the task, pin active work, and archive finished chats from the three-dot menu. A name like “Fix mobile menu” is easier to find later than “New chat.”
If the connection doesn’t work
If your computer is missing, check that the desktop app is running, connections are enabled, and both devices use the same account and workspace. Update both apps and pair again if needed.
If a session disconnects, check the computer’s power and network first. Keeping the phone awake won’t help if the host has gone to sleep.
If you can’t find Codex or Remote, check feature availability and your workspace’s Remote Control settings. Signing out can also turn Remote Control off; enable it again after signing in. OpenAI keeps the connection troubleshooting steps in its setup guide.
For a first attempt, use one small change with an observable result: an input check, a layout fix, or a regression test. Review the plan, inspect the command output, and check the diff before committing. That gives you a complete remote workflow you can repeat without guessing what ran on the host.
Adapted from my original guide on proflead.dev.
Cheers, proflead 😉
ссылка на оригинал статьи https://habr.com/ru/articles/1105256/